It's always interesting to read about ways in which one's work has had an impact on others. Here are a couple of recent examples that I am happy to have the opportunity to reference:
First, I'd like to thank Andy Shaw and the leJOS team for their support of my webcam work on the EV3. They were able to incorporate my work into the leJOS code base, for the benefit of anyone wishing to use the leJOS platform for computer vision on the EV3. It was great fun getting it working this past summer. It would not have been possible without the terrific infrastructure their team has put into place, as well as their hands-on assistance as my project proceeded in fits and starts.
This semester, I am teaching a course focusing on the use of computer vision as a key sensor in robot programming. In the process, I'm experimenting with different vision algorithms on the EV3 platform. After the end of the semester, I plan to post in some detail about what worked best for us.
Second, Malcolm McCrimmon, who several years ago was one of my students, has written a fascinating reflection about what makes both Lisp and Smalltalk such powerful languages. I'm a bit humbled to see that this reflection was prompted by an impromptu four-word answer I gave to one of his questions in class. I'm teaching the course again this semester, and I'm looking forward to incorporating some of his insights into our classroom examination of these languages.
Observations and commentary on robotics, AI, machine learning, and computer science (and academic life) in general.
Friday, September 26, 2014
Friday, September 19, 2014
Lego EV3 Model for Computer Vision
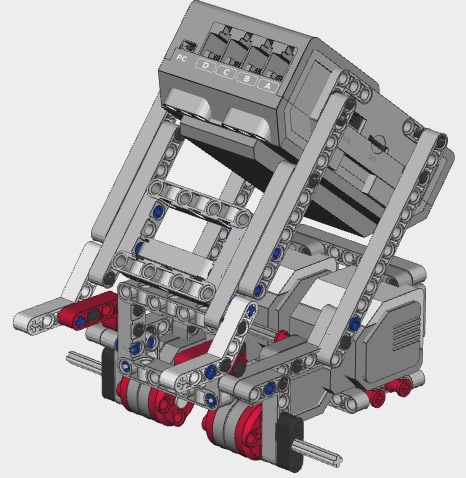
Using the EV3 platform for computer vision is not just a matter of plugging the camera into the USB port with a properly functioning driver in place. It is also important to get the right physical design for development and debugging.
I'd like to share a model I have designed to facilitate this. The LCD screen is rear-facing, at an angle, so as to allow a developer to see the images that the robot is acquiring as it navigates its environment.
The webcam can be inserted inside the open-center beam in the front of the robot. I positioned another 5-beam above the webcam to hold it in place a bit better. (That part is not included in these instructions, but you can see it in the photo.) Some of my students used rubber bands to hold it in more firmly. I used a Logitech C270 webcam.
I built it using the Lego Mindstorms EV3 Education Kit. To attach the wheels, follow the instructions on pages 22-25 and 32-33 of the instruction booklet that is included with that kit.
I do not know if the parts available in the regular kit are sufficient to build it. Feedback would be welcome from anyone who has a chance to try that out.
I created the CAD model using Bricksmith.
Without further ado, then, here is the model:
We start with the left motor:
Now we begin work on the right motor:
Subscribe to:
Comments (Atom)


